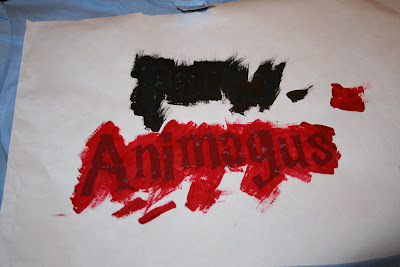
Harry Potter Freezer Paper Stencil T-shirts in 4 "Easy" Steps
The first time I tried this method, I was skeptical. I had tried painting t-shirts before and they always looked like I had painted them myself and only possessed marginal craft-ability. That frustrated me because (in my opinion at least) I'm not so shabby at crafty stuff.
Then I gave the freezer paper stencils a whirl because I refused to shell out fifty bucks for a t-shirt at chasing fireflies. Honestly. It was like magic! I wanted to make about thirty shirts a day and give them away for birthdays, graduation, and Ground Hog's Day. If you play your crafty cards right, you can make a quality shirt for about $1.50. AWESOME, yes? YES! (Okay, I'll go take a break for a minute and calm myself.)
Now that I'm back, I won't lie to you. It does take a little bit of patience. That being said though, if my kids can do it, other kids (and adults) can do it too!
What you'll need:
*Freezer Paper
(NOT wax paper) You can buy this at the grocery store right by the aluminum foil, plastic wrap etc. It costs about 5 bucks (in muggle money) for a whole box of many, many feet of the stuff.
*T-shirts
We bought ours for the kids at the dollar store. Most craft stores (and Walgreens) have t-shirts for 2-3 dollars.
*Fabric Paint
NOT acrylic paint. For these to really look sharp you need to buy fabric paint. It costs about $2 a bottle and you can do several shirts with one bottle.
*Exact-o-knife
Personally I recommend buying the knock-off knives for about one-third the price.
*Sponge paint brushes
These cost about a dollar for five of them.

Now you're ready to get going. Here are the 4 steps:
1) TRACE
Print out or draw your design and then put it under the freezer paper so that you can trace it. Make sure you trace it on the NON-shiny side.
2) CUT
With an exact-o-knife (or a cheaper knock-off for about one-third the price), carefully cut out the INSIDE of the design. We just cut out pieces of cardboard from old boxes to put under the paper so we didn't ruin the dining room table. This is the part that takes the most patience. I showed the kids how to do their first letter and then they took off. (For kids under 5, you'll probably want to do this part for them.) Now you've got a stencil.
3) IRON
Carefully center the stencil on the t-shirt with the SHINY side down. Don't use any steam. Hold the iron over each spot for a good ten seconds.
4) PAINT
This is the best part because ALL of the kids (except the baby) could do it. You can paint away to your heart's delight and you don't have to worry about smudges or sloppiness. Go ahead and slop away. Just make sure you get all of the corners of the stencils so that it looks sharp. Put a piece of cardboard inside the shirt so the paint stays on the side you're painting.
Now all you have to do is wait for the paint to dry. A lot of people will tell you that you need to sit and wait for 24 hours, but that is a bunch of bologna (baloney? How do people spell that nowadays?). My poor kids were keeping a fidgety vigil by their t-shirts and there was no way I was going to make them wait that long. They really do dry in 3-4 hours, so unless you need to use it as leverage to make them get some chores done, let them rip the stencil off after a few hours. Really.
Then just put a light cotton cloth over the design and iron it to make sure the paint has set. Then you can wash it and dry it just like a normal store-bought t-shirt. (But this is so much better because your kids made it themselves!)
We made up the designs ourselves, but you have to be familiar with the books to "get" some of them. (We are NOT nerds. Stop being rude.)
(You are free to do any non-nerdy things with your own t-shirts at your leisure.)


I don't have a picture of Eric or me in our t-shirts that you can see very well, but his said, "What's Your Patronus?" and mine said, "Not my daughter, you *itch!" (Heh, heh, heh. We put a lightening bolt instead of the asterisk. You have to know the book to appreciate that one, but that part seriously made me cry because I loved the power it gave to motherhood. You think I'm kidding, but I'm totally NOT.)
*If you'd like to use our designs, I can e-mail you a pdf file. I can't for the life of me figure out how to post the designs here.


5 comments:
LOVE it! Wish I would have been that creative for the premiere. Oh well, we drew the Deathly Hallows on our faces. Poorly, but it was there.
Why, why, WHY are you so awesome?!?
First, I LOVE that you read the whole durn series OUT LOUD to your kiddos! How cool is that?!? (And I can relate to my kids not wanting me to do accents--I try it on Roald Dahl books and they complain, but I don't continue til they stop whining, and then I keepup the accents. Heh. The perks of motherhood:-))
And then to have a whole WEEK of Sarah-awesomeness?!? *sigh* The only thing I don't like is that I wasn't there. Everything looks ah-mazing (per your usual), and just when I think I can't love you more, I do...
P.S. Thanks for the how-to on the shirts--we will totally have to try it!
Seriously, you are AMAZING! Can I just "ditto" Tif's whole comment. Very very inspiring! And I loved your T-shirt quote and the reason you liked it... awesome!
Wow. Just wow. :) How can you guys come live next door to us? (Or even settle for down the street--or even the same town . . .)
AWE.SOME!!! (BTW that was my fav line of book seven too!)
Post a Comment